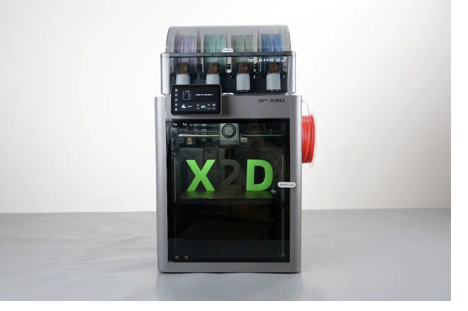
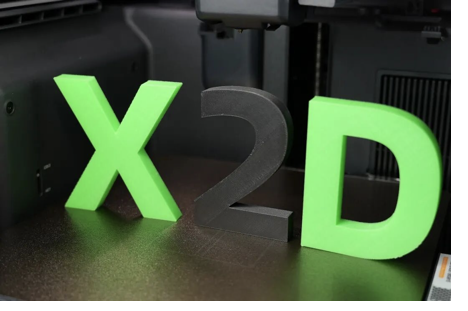
Bambu Lab X2D Review: A New Choice for High-Value Dual-Nozzle 3D Printing
Premium performance. Mid-range pricing. That’s the Bambu Lab X2D in a nutshell.
Not long ago, Bambu Lab officially announced the discontinuation of its classic X1 series 3D printers. The newly launched X2D perfectly fills that gap and further refines Bambu Lab’s product lineup, creating a complete matrix that covers the entry-level A series, the mid-range flagship P series, the flagship H series, and the upper-mid-range X series.
Hard to believe — four years have passed in the blink of an eye.
Looking back to 2022, the Bambu Lab X1 series undoubtedly rewrote the trajectory of consumer-grade 3D printing. It pushed the industry from the early era of slow, complex user experiences into a new stage defined by speed and ease of use. The X1 series significantly improved print quality and success rates — and truly brought multi-color printing into reality.
In a sense, the X1 ushered in the desktop FDM 2.0 era, laying the foundation for the rapid growth of Bambu Lab — and the entire industry — today.
Now, as the second-generation product of the X series, the X2D has launched at 4,499 RMB — a full 3,400 RMB cheaper than the original X1C and only 800 RMB more than the P2S. Frankly speaking, this pricing is significantly lower than we expected, making the X2D even more compelling.
“The biggest real-world benefit of the X2D’s dual-nozzle setup? Faster filament changes. Whether you’re printing two colors or running AMS on both nozzles, you get quicker multi-color prints — and a lot less waste from purging.”
At the same time, it also supports mixing different materials in the same print, such as TPU and PLA. Users can also dedicate one nozzle to the main model while the other handles supports, balancing both efficiency and print quality.
Device Specifications:
Specification
Details
Technology
Fused Deposition Modeling (FDM/FFF)
Machine Dimensions
392 × 406 × 478 mm
Build Volume
256 × 256 × 260 mm
Max Print Speed
1000 mm/s
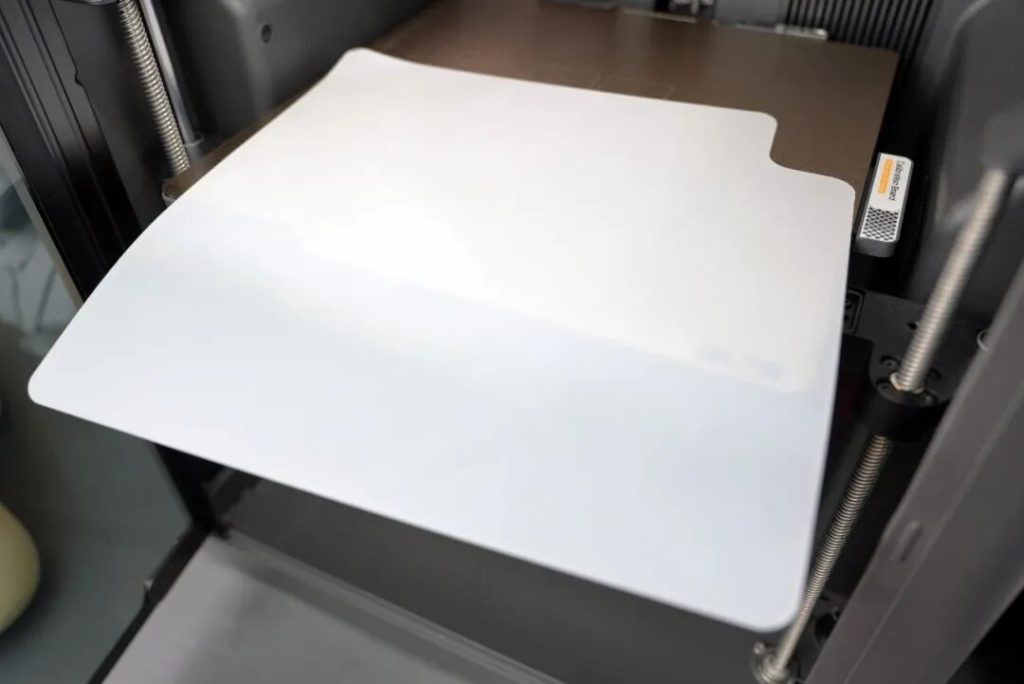
Build Plate
Textured PEI Sheet
Nozzle Max Temp
300°C
Heated Bed Max Temp
120°C
Max Controlled Chamber Temp
65°C
Slicer Software
Bambu Studio (supports other third-party software)
Dual Nozzles – Enables faster filament switching, reduced purging waste, multi-material mixing (e.g., TPU + PLA), and dedicated support material printing.
Smarter & Safer – Equipped with 31 sensors + AI monitoring, including foreign object detection, build plate placement verification, and real-time print process surveillance.
Great Value – Priced at just 4,499 RMB (standalone) / 5,999 RMB (multi-color kit), or as low as 3,399 RMB with subsidies — significantly cheaper than the original X1C.
Cons:
Auxiliary Nozzle Performance Slightly Lacking – The secondary nozzle shows slightly weaker performance compared to the primary nozzle in certain printing scenarios, which may affect print quality on multi-material or support-specific tasks.
After using the X2D for some time, its overall performance has been highly satisfactory. It can be described as a model with outstanding product strength, positioned squarely between the P2S and the H2D.
At first glance, it looks like a “mini H2D”: dual-nozzle design, print speeds up to 1000 mm/s, active chamber heating, plus AI detection, servo motors, intelligent temperature control, and air filtration — all present. When paired with multiple AMS units, it can support up to 25 colors.
Of course, the X2D is not simply a shrunk-down H2D. It does not support the optional laser engraving module. And although both are dual-nozzle machines, the X2D employs a different architecture: a direct-drive main extruder paired with a remote auxiliary feeding system. Furthermore, unlike the H2D, which uses motor-driven nozzle switching, the X2D adopts a lighter and more flexible mechanical nozzle-switching system.
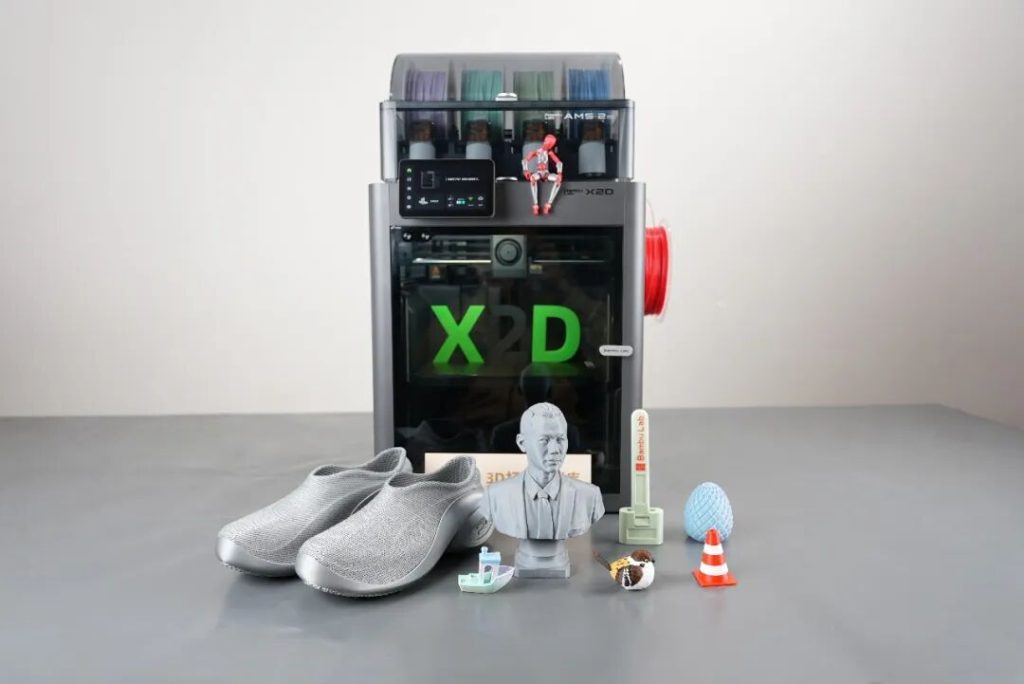
Unboxing
Today we’re testing the X2D multi-color kit. Like every other Bambu Lab printer, it’s pretty much plug-and-play. Unbox, spend ten minutes attaching the screen, spool holder, AMS 2 Pro, and exhaust fan — and you’re ready to go. The Quick Start Guide makes it hard to get lost
Inside the box, you get everything you need to set up and maintain the X2D: hex keys, a spare hot end, nozzle wiper, power cord, cleaning needle, scraper blades, PTFE tubes, and grease. But one thing you won’t find? Filament. Bambu Lab has stopped including it — kind of like Apple ditching the charger. You’ll need to buy your own
2. Design
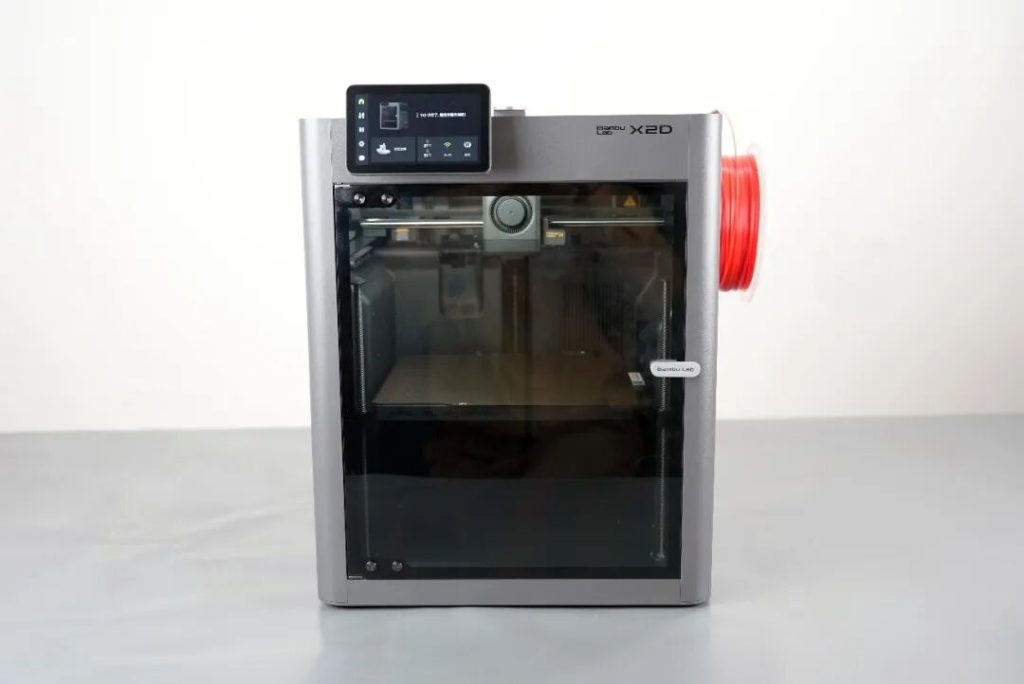
2.1 Frame
Without a doubt, the X2D remains a classic CoreXY fully enclosed 3D printer, with a body constructed from a sheet metal frame, plastic casing, and glass panels. The overall appearance is very similar to its predecessor, the X1C, but the color has changed from light gray to dark gray. At the same time, semi-transparent windows have been added to both sides of the machine, making it easier to observe the internal operation status.
Another obvious change: the X-axis. Bambu Lab has moved back to traditional linear shafts instead of carbon fiber rods — just like on their other current models. The upside? Easier maintenance down the road.
With a single nozzle, the main hot end gives you 256×256×260 mm,
and the auxiliary one 235.5×256×260.
In dual-nozzle mode, the usable volume depends on your math: i
ntersection drops it to 235.5×256×260, but union keeps it at 256×256×260.
Like the H-series flagship, the X2D has active chamber heating — up to 65°C. That’s a must for engineering materials like nylon. And even for everyday ABS, it cuts down on warping, boosts layer bonding, and gives you better results, more often.
2.2 Cooling and Air Circulation
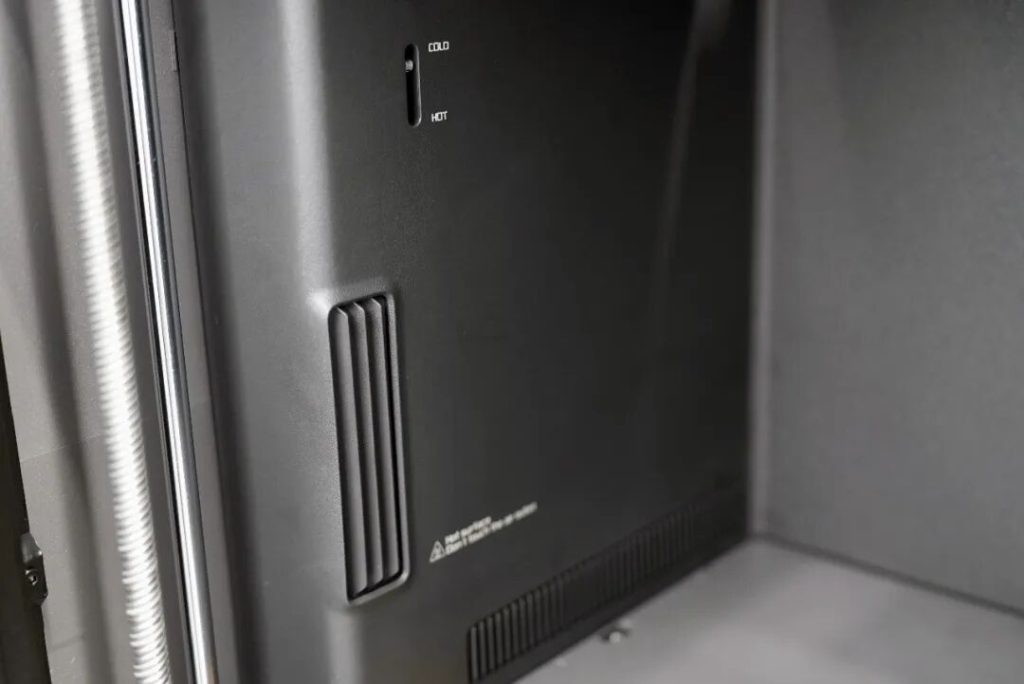
The adaptive airflow system, previously found only on the H-series, has now been introduced to the X2D and has been further upgraded. The X2D automatically adjusts airflow based on the material being used: introducing cool air for low-temperature materials and sealing the chamber for high-temperature materials, with internal baffles switching automatically as needed.
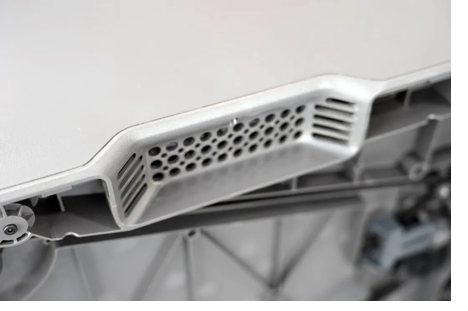
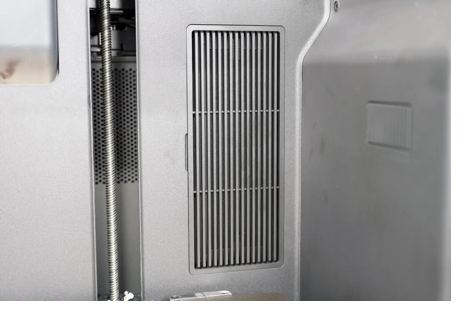
The X2D also hides the exhaust vent inside the carry handle and adds a second air intake. In real-world use: printing PLA with the door closed still gives you clean overhangs and great bridging. For ABS, it keeps the chamber temperature steady while filtering the air — no compromises.
In addition, an external exhaust fan has been added this time, with a built-in filtration structure inside as well. When printing engineering materials like ASA in our office, we could hardly detect any noticeable odor, which speaks to the effectiveness of the filtration system
2.3 Extrusion and Hot End
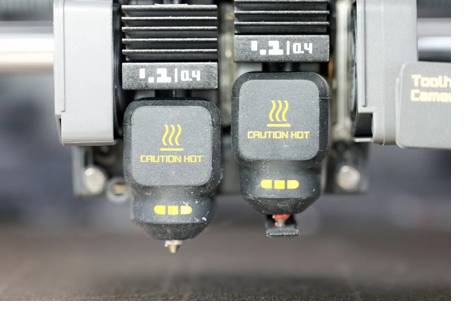
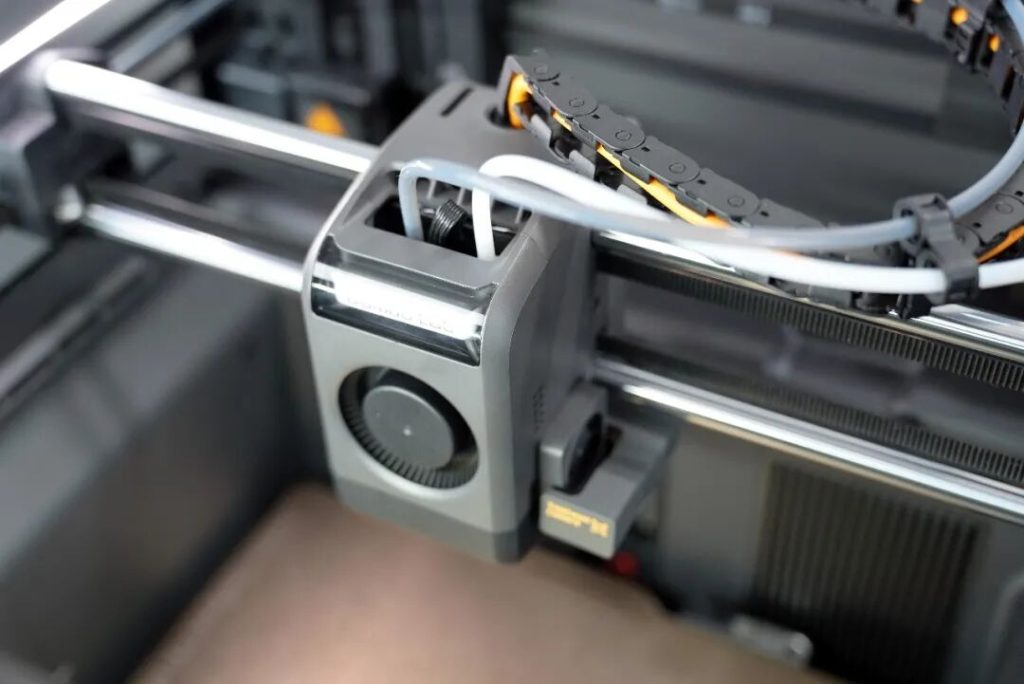
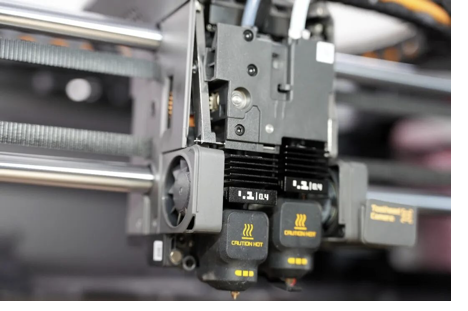
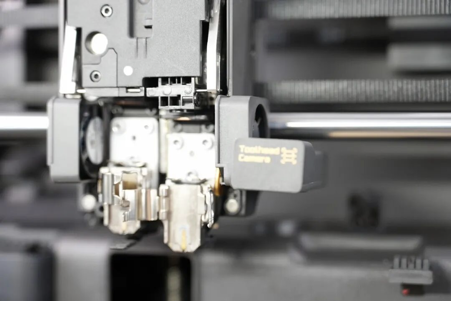
As mentioned earlier, the X2D’s biggest highlight is its dual-nozzle design, but it is not exactly the same as the H2D. Due to the need to integrate two nozzles within a limited space, some structural trade-offs were inevitably made.
The left main extruder is direct-drive with a servo motor and dynamic flow calibration — stable and precise even at high flow rates. The right auxiliary extruder is Bowden-driven, with the motor tucked at the back. That keeps the toolhead lighter and cuts down on high-speed vibration.
However, this design also limits material compatibility — flexible filaments like TPU cannot be fed through the auxiliary extruder. At the same time, due to the remote feeding mechanism, the actual print speed and model quality of the right nozzle are also lower. To be honest, when the X2D was first teased, we initially thought it was a solution specifically optimized for TPU printing.
That said, the X2D still has some clever tricks. Nozzle switching is now fully mechanical — no motors involved. The result? A more compact print head.
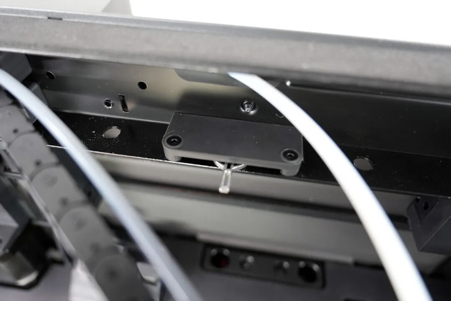
The cutter drive mechanism, previously located on the side of the printer, has now been moved to the center of the rear chamber. Cutting the filament now only requires pressing a small metal lever. This not only reduces idle travel time but also takes up less space — a design element we expect to see carried forward in future models.
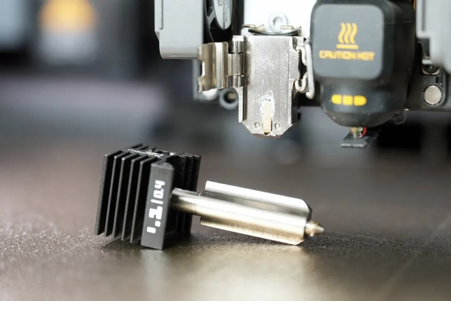
The quick-swap hot end design first introduced on the A1 series has now been applied to the X2D as well. The “one clip, one latch” mechanism makes nozzle changes much more convenient. At the same time, the extruder gears and nozzle have been upgraded to hardened steel, further improving wear resistance and longevity — and enabling direct use of fiber-reinforced materials such as PLA-CF and PETG-CF.
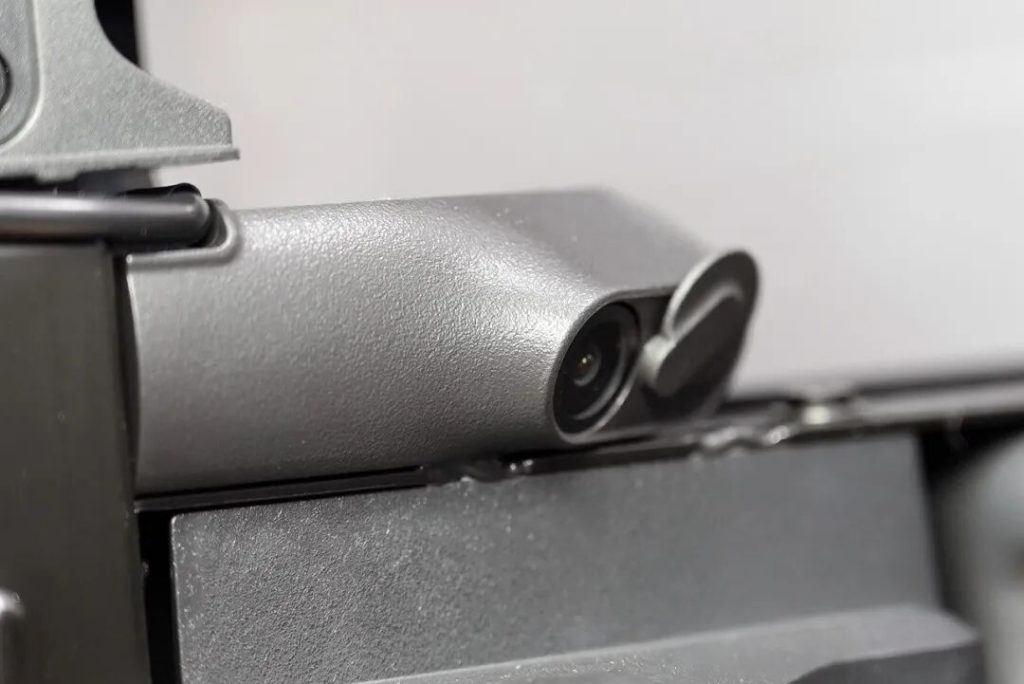
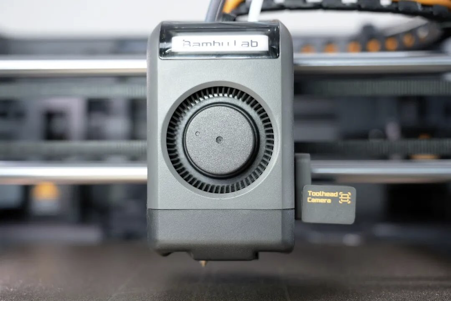
2.4 Camera and Touchscreen
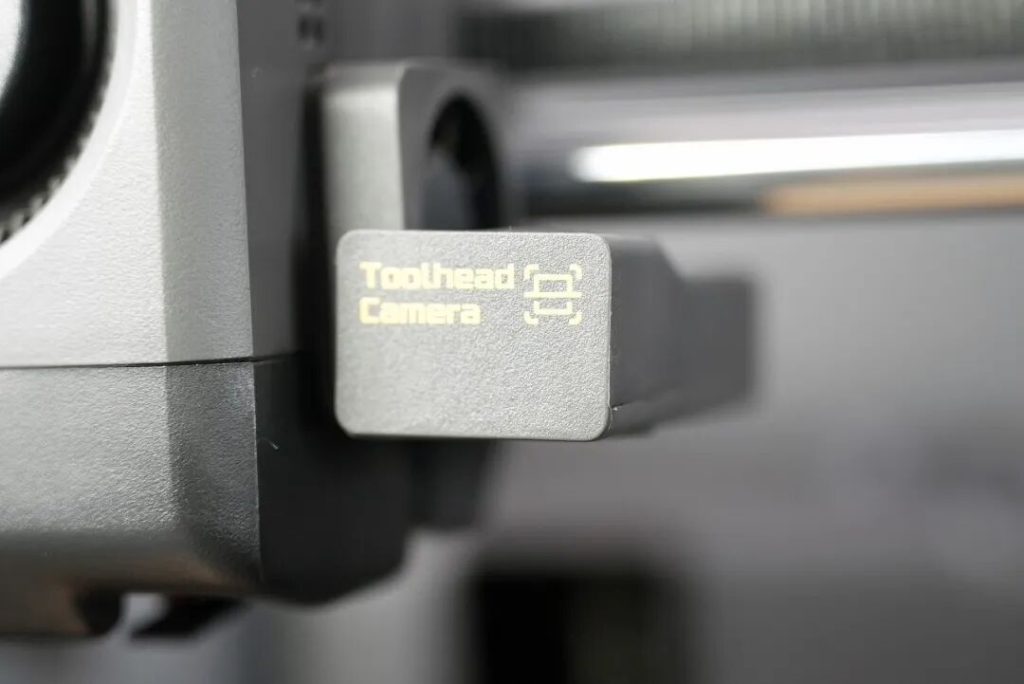
If there is one area where the X2D still clearly shows its predecessor’s influence, it’s the toolhead camera — a feature that the P-series or A-series models lack.
Compared to the past, where the toolhead camera also handled LiDAR scanning, its primary role now is absolute precision calibration. At the same time, its AI functions include print bed offset detection and camera contamination detection.
As for the onboard live camera, it now supports 1080P video recording at 30fps and features enhanced LED fill lighting, greatly improving its practicality. It also works with AI to detect errors, identifying common issues such as “spaghetti” (failed prints), filament wrap-around, and waste chute blockages.
Take the “spaghetti detection” function as an example. The X2D’s sensitivity seems noticeably higher than that of many competing products. During one shoe printing job, the system repeatedly triggered anomaly alerts and paused the task. In the end, I had to temporarily disable the feature just to let the print continue.
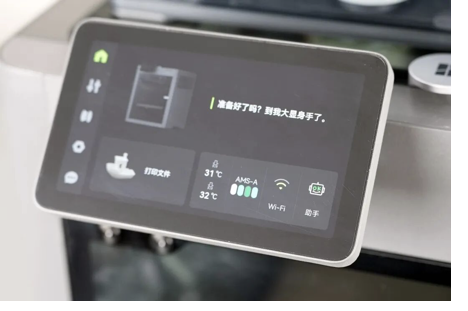
The 5-inch color touchscreen has been updated — smoother, snappier. And every now and then, it pops up a little 3D printing quote. A nice touch that makes the machine feel less… industrial.
Besides Wi-Fi and LAN printing, there’s a USB port too. Load files straight from a flash drive, or save your time-lapse videos. Simple but handy.
2.5 AMS Multi-Color System
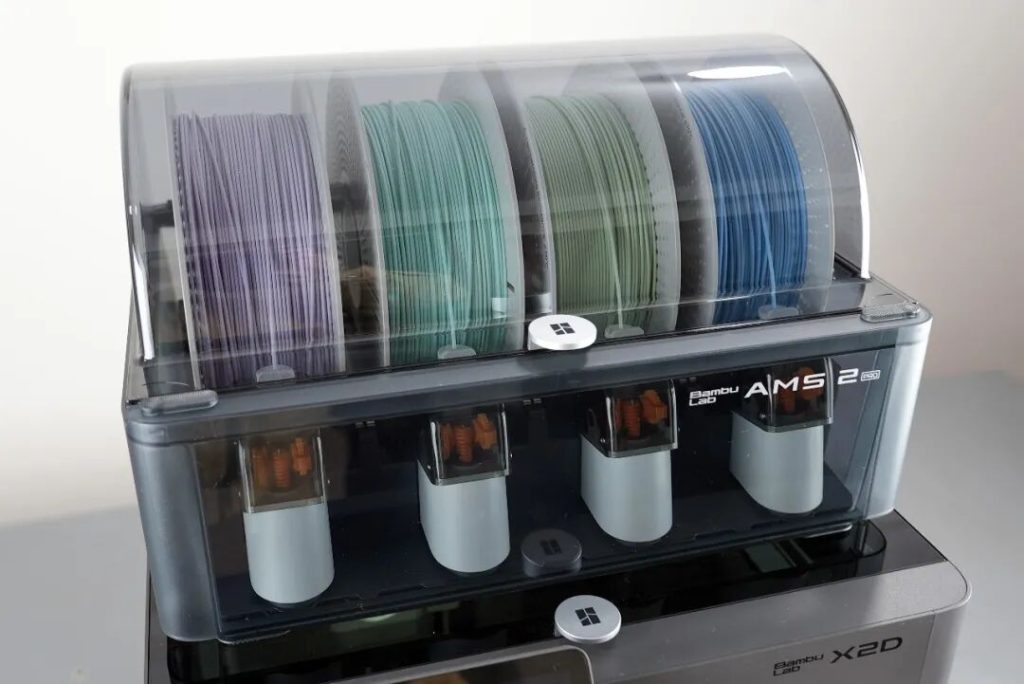
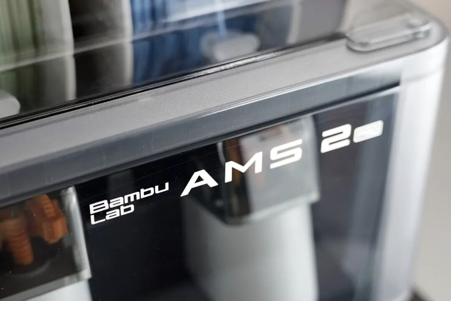
The H2D’s multi-color kit comes standard with the brand-new AMS 2 Pro, which can hold four spools simultaneously for multi-color printing. By connecting up to four AMS 2 Pro units and eight AMS HT units at the same time, the X2D supports up to 25 colors in dual-nozzle mode.
In fact, the AMS 2 Pro is more than just a multi-color printing system. Compared to the previous generation, in addition to automatic loading/unloading and automatic filament identification, it now features a filament drying function. With a maximum drying temperature of 65°C, it is sufficient for most common materials.
Additionally, the second-generation AMS 2 Pro is equipped with an adaptive damper system that automatically switches between drying and storage modes, achieving a balance between both functions.
3. Printing
According to official specifications, the X2D can reach a maximum print speed of 1000 mm/s and a maximum acceleration of 20,000 mm/s². However, actual print speeds typically depend on the model and material, usually staying in the range of 200–500 mm/s. More important than the raw speed itself is the printer’s ability to maintain uniform layer lines and sharp edges even under high-flow output.
3.1 Testing
Before starting an actual print, we usually check whether the build plate is level. Many people spend half an hour printing a 0.2mm first-layer test model.
But with the X2D, bed leveling is essentially no longer a concern. Its auto-leveling performance has proven to be sufficiently mature and reliable.
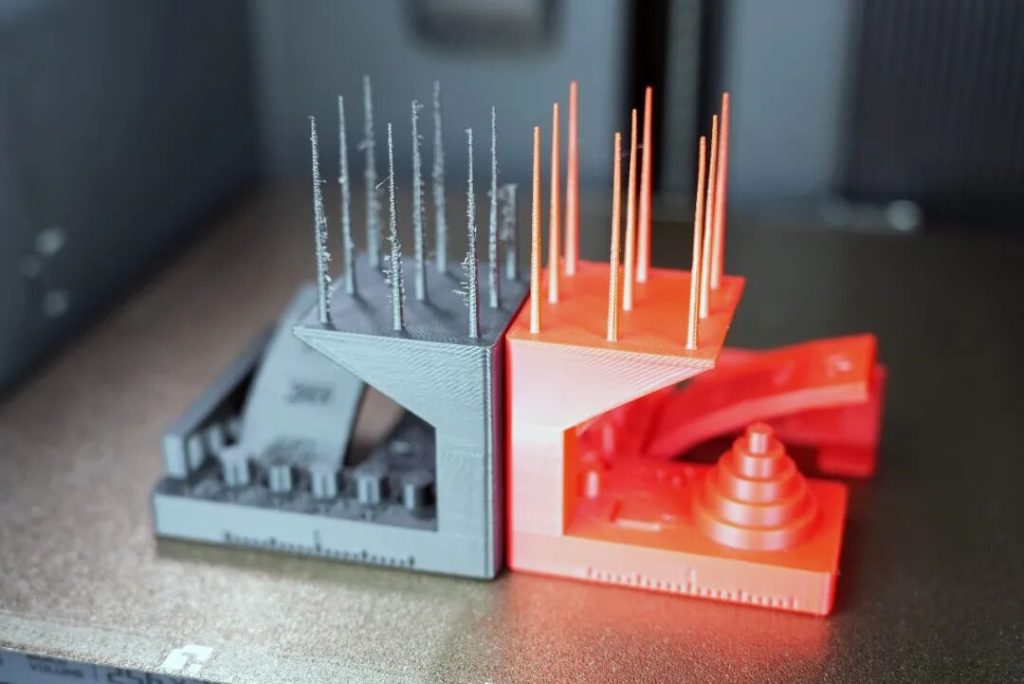
We then printed two identical multi-functional test models. It’s worth noting that the stringing on the left gray model was not the printer’s fault — the filament had been sitting out for a long time without drying. After drying the red PLA and reprinting, the results improved significantly. Furthermore, whether it was the 15° overhang or the 0.2mm tolerance test, the X2D performed excellently.
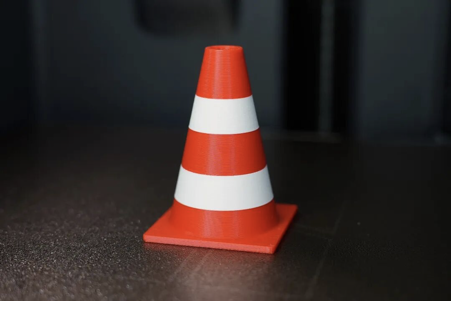
Looking back more than a decade ago, most dual-nozzle 3D printers were still in a fixed-nozzle configuration. And one of the classic test models from that era was this traffic warning cone.
This time, we printed the same model on the X2D. The finished print had no layer shifting at all, and overall looked as if it had been printed with a single nozzle in one go. At the same time, the color transition between the two nozzles was very clean and sharp — a clear testament to the X2D’s impressive print precision.
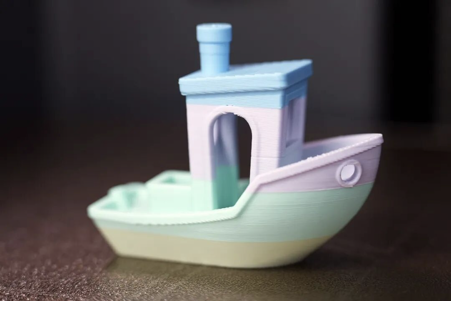
Next, we also tested a 4-color 3DBenchy boat. The color separation on the finished print was once again sharp, the filament switching was smooth, and the overall result was quite impressive. Of course, just for the record, the aesthetic filament used here was provided by KEXCELLED.
Finally, we selected a scraper from the printer’s built-in example models, printed it, and quickly assembled it with the included blade. It was another fun DIY experience — proof that with this machine, you can truly print whatever you need.
3.2 Materials
The X2D not only supports common base materials such as PLA, PETG, and ABS, but is also compatible with TPU elastic materials, fiber-reinforced filaments like PLA-CF/GF, and is even capable of printing engineering-grade consumables such as PA and PC.
In this test, we primarily validated its performance using conventional materials.
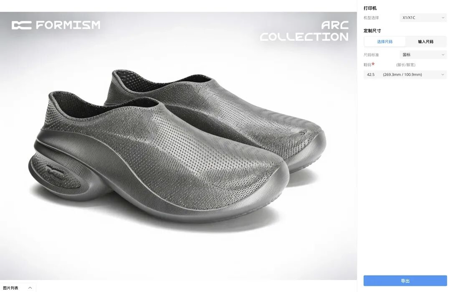
Given the rising popularity of 3D-printed footwear, we first used Bambu Lab’s official TPU 90A material to print a pair of shoes in size 42.5 (EU).
To find a pair of shoes I truly liked, I compared several related models on MakerWorld and eventually settled on this casual shoe design by FORMISM. Using the size customization feature, I was able to select the perfect fit for my feet.
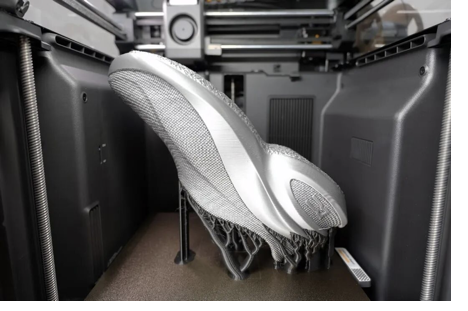
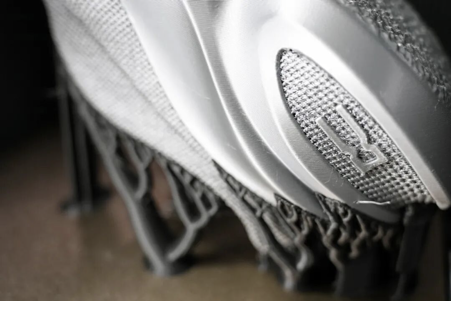
The entire printing process took nearly four days in total, completed in two separate prints. While the finished shoes still had some minor cosmetic imperfections, they felt good when worn — breathable, with noticeable rebound underfoot. As for how long they will last, that is still being tested and awaits further validation.
It’s worth noting that the main body of the shoe was printed in TPU, while the supports were printed in PLA. As a result, not only was the removal process much easier, but the surfaces left behind after support removal were also much cleaner. In the past, applications like this relied heavily on the H2D — a machine costing upwards of 10,000 RMB. But now, the X2D, at under 5,000 RMB, is already up to the task.
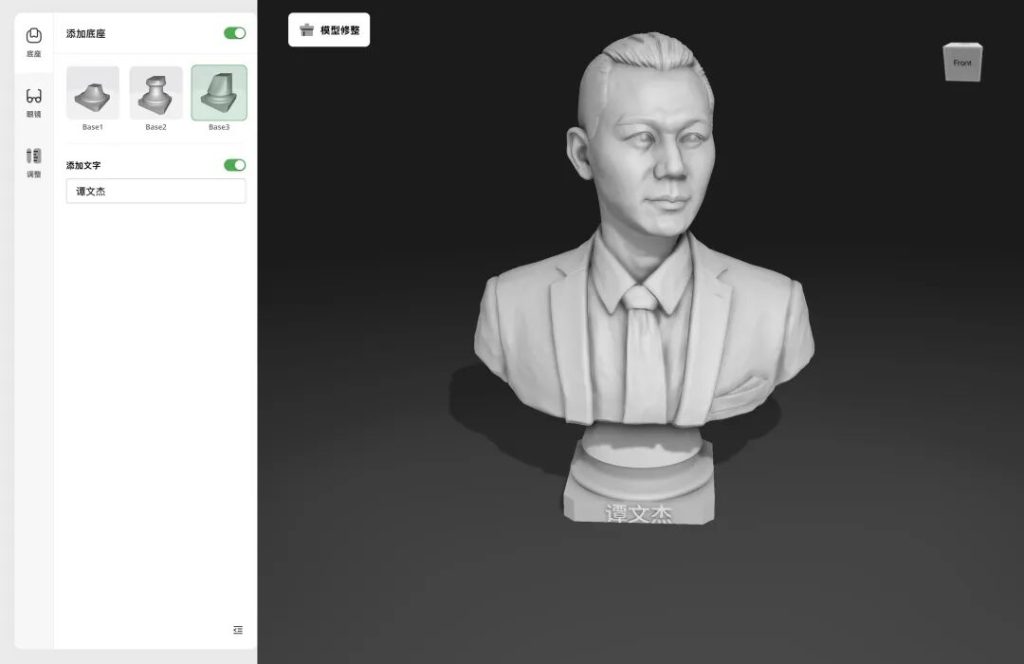
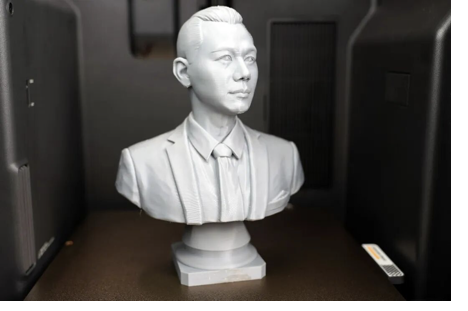
Next, we also tried out the increasingly popular AI modeling feature.
Using MakerWorld’s MakerLab Statue Generator 2.0, I uploaded a photo of myself and quickly generated a highly realistic half-body bust model.
Since I had some ASA material on hand, I went ahead and printed it — the job took 6 hours and 45 minutes. As for the final result, you can judge for yourself. In my opinion, the overall resemblance exceeded 80%, with the side profile looking especially like me. It was certainly an interesting experiment.
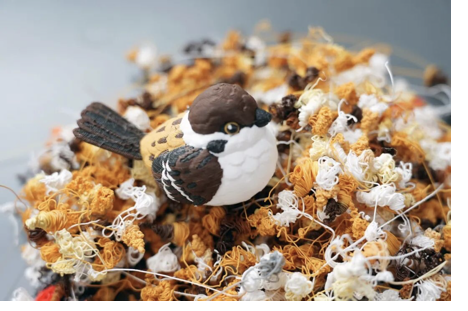
As the weather warms up, the sound of birds chirping outside my window in the early morning has become more frequent. So for our third test model, I chose a sparrow — printed in four colors using standard PLA material.
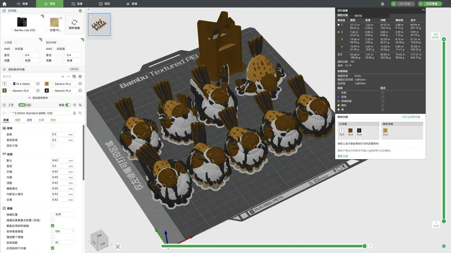
The original file defaulted to printing nine sparrows at once, with a total estimated time of about 1 day and 9 hours. To verify the quality, we printed just one this time. It took 11 hours and 15 minutes, consuming a total of 154g of filament — of which the bird itself was only 22g. So while the sparrow was printing, we also went ahead and “made” a bird’s nest.
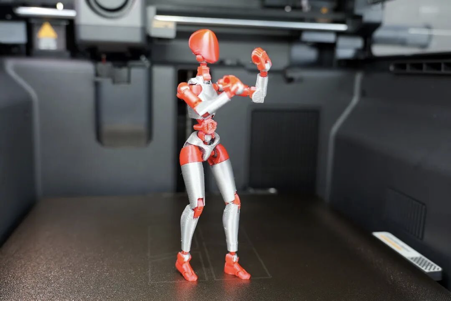
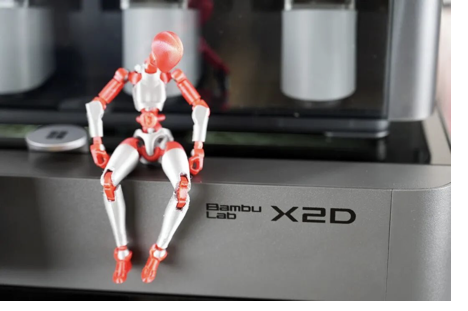
And quite by accident, I discovered that Dummy 13 — the articulated posable robot figure — has been updated to version 2.0. Naturally, we printed one and assembled it.
The gray parts (joint structures) were printed in TPU 90A, while the red parts were printed in PETG — achieving a combination of flexible and rigid materials. The final result turned out quite well. If proper licensing were available, I believe many people would be willing to pay for such a product.
3.3 Software
Without a doubt, Bambu Lab’s Bambu Studio remains an outstanding slicing software, and it continues to improve.
dThrough Bambu Studio, users can slice, preview, and directly send print jobs. The material parameters are already well-tuned, so most of the time, you can simply import a model and start printing.
At the same time, it is deeply integrated with MakerWorld, allowing users to access the model library directly within the software and choose from over one million printable models. Whether you’re looking for toys, tools, or creative designs, most needs can be met on the platform — and they can be downloaded and printed for free.
In addition, single-material printing is already quite mature, but the dual-material printing workflow is noticeably more complex and requires some time to understand how to assign filaments to each nozzle. Fortunately, in most cases, simply following the software’s default recommended automatic mode is sufficient. As for the more detailed custom logic, I am still exploring it myself.
The accompanying Bambu Handy mobile app is also very user-friendly. It supports remote monitoring and is fully integrated with MakerWorld, allowing you to initiate print jobs directly from your phone. Additionally, it features an AI-powered smart assistant that provides instant answers when you encounter print anomalies or other issues during use.
Of course, with the launch of the X2D, Bambu Lab also offers several optional accessories to enhance the printing experience.
For example, the TPU filament feeding assist module reduces feeding resistance for TPU, improving print stability. The visual calibration board can be used for precision calibration, further enhancing print performance. And the filament switch optimizer is primarily designed to improve the connection and switching between the dual nozzles and the AMS system.
4. Criticisms
To put it simply, the Bambu Lab X2D is a more affordable 3D printer that doesn’t compromise on performance. It is fully capable of carrying the torch from the X1 series, whether for home or office use. If I really had to point out a few issues, here they are.
First, the machine’s beeps and alerts are too loud — to the point where I wanted to turn them off completely. If Bambu Lab could add a volume control feature in a future update, the experience would be much more user-friendly. Especially when printing overnight in a living room, no one wants to be startled awake in the middle of the night.
Second, the auxiliary nozzle’s print performance is indeed inferior to the main nozzle. This is largely due to the current structural design and is unlikely to change anytime soon. The more sensible approach is to let the main nozzle handle the majority of the printing tasks, while using the auxiliary nozzle primarily for support structures.
5. Conclusion
If the now-discontinued X1 series once brought the industry into a new era of high-speed, multi-color printing, then the X2D — its successor — may very well be trying to make dual-nozzle printing the next industry standard.
In fact, around 2013, dual nozzles were once the mainstream in the industry. Now, thanks to Bambu Lab’s renewed push, they may be rediscovered and re-embraced by the market.
The H2D represents the performance ceiling of consumer-grade dual-nozzle 3D printers, but its higher price also limits its widespread adoption. In contrast, the X2D offers a mature dual-nozzle solution, a complete ecosystem, and excellent ease of use at a much more accessible price — making it the more compelling choice for most users right now.
Of course, if you just want to experience the fun of 3D printing, the entry-level A1 is more than enough. For print farm production, the P2S is a solid choice. And if you prioritize large build volume, the H2S is clearly more appealing.
But if your core needs are cleaner support removal, less purge waste, and the ability to combine TPU and PLA for functional prints — then at least for now, the Bambu Lab X2D is definitely worth a try.